Thursday, December 28, 2006

Peppermint Truffles

One of my favorite memories of my parents, not surprisingly, involves food. One winter break during high school or junior high, my mom brought home a box of incredible dark chocolate truffles. The ganache center was impossibly smooth and tasted strongly of peppermint and cocoa. The white chocolate coating snapped when you bit into it, perfectly balancing the rich, creamy filling, and each truffle was rolled in crushed candy canes.


There’s something about girls and good quality chocolate that just takes forever. My brothers could probably eat six in the time it took Mom and I to finish the first bite. Which is probably why we neglected to tell them we had chocolates. Another strategy is to buy a couple of Twix bars and hope they get distracted.


As expensive sweets go, seconds couldn’t come until Dad got to try one. I remember leaning on the counter when he got home, my eyes fixed to that box, watching Mom pick out the nicest one. She fed him his first bite, then he held the second half, chewing. Mom and I were silent and grinning, excited to share our treasure.
“Hmm… I’d rather have a jelly bean.”


I don’t think Dad will ever live it down. This year for Christmas, I made Mom a box of reproductions and bought Dad a bag of Jelly Bellies. We can’t find the original truffles anywhere. Jelly Belly jellybeans, on the other hand, are likely available near you...


This recipe is from memory and estimations. I’ll try again to verify the amounts, but I think the best part of this trial is step 3. I have never before seen such easy to work with truffles, and believe me I’ve seen truffles. I thought I’d never ever want to hear the word “truffle” again after helping produce over three thousand white and regular chocolate truffles in our school bakeshop. You will need to start a day before you want finished truffles.


Peppermint Truffles
Ganache:
12 ounces dark chocolate
1 cup heavy cream
Peppermint extract to taste (start with 2 tsp and don’t be afraid to add!)

Coating:
12-16 ounces white chocolate
2 boxes candy canes

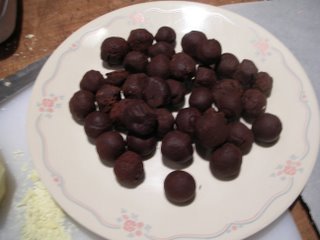
1. Bring the heavy cream just to a simmer. Meanwhile, chop the chocolate into small pieces. Take the saucepan off of the heat and add the chocolate. Stir until smooth.
2. Once the ganache is cool (like paste or peanut butter), you can shape the truffles. I used a pastry bag with a round tip, but you can probably use a plastic bag with a corner snipped off to make a hole with a ¼ inch opening. I set out parchment paper and piped balls that were a little smaller than truffle size. You can also form balls with two spoons or your fingers if they aren’t warm. Don’t worry if they aren’t perfect. You can roll them in your palm a bit on day two.
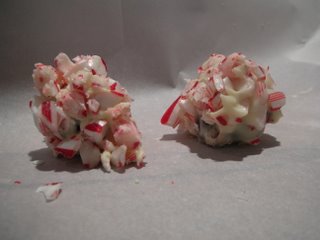
3. You have to believe me on this next one. Leave them out overnight. Not near heaters, direct sunlight, kids, dogs, husbands (my Dad is OK, though), or best friends, but leave them out. This dries out the surface and keeps them at a moderate temperature. They will be much easier to handle and coat. It’s easier to fix their shape when they are malleable but have a dry surface than when they are cold and hard and possibly sweating from the temperature changes between the fridge and the room.
4. Crush the candy canes the next day.
5. Quick temper the white chocolate in small batches. I melt about 4 ounces white chocolate in the microwave, stirring every thirty seconds until all of the chunks are gone, then add about an ounce of chopped chocolate to bring the temperature down and to at least try to get the look and snap of properly tempered chocolate.
6. My best advice for coating is use relatively cool coating chocolate, drop the ball in, be quick, use a thin pronged fork or a truffle fork, and tap off most of the excess. I’ve seen people keep melted chocolate in the palm of one hand and roll the truffle there, but it’s messy and takes a few to master.
7. Roll the truffles in the crushed candy canes, then let them dry and cool.

Remember: The first truffle is the practice truffle. It will most likely be the ugliest truffle. This is the best truffle, though, because this is the one you eat guilt-free once you are done. I actually ended up with quite a few practice truffles, which I am not complaining about.


Jelly Bellies
1 bag Jelly Bellies

1. Buy a bag of Jelly Bellies.
2. Dad’s happy.

Wednesday, October 18, 2006

Fake Thanksgiving

For nearly no reason whatsoever, my flatmates & I threw a thanksgiving dinner on Sunday. Thirty of the people we enjoy the most came to celebrate & eat with us.

Up in the Italian District, in between cafes & pizza places, hotels & high-end restaurants, hides a poultry butcher complete with a backroom full of live chickens & geese. On Thursday, I ran up the hill & asked if they had any turkeys in. The owner pointed to his friend, telling me he only had the one in (har har). But he went out to a local turkey farm & got a beautiful twenty one & a half pound turkey for me, plucked, cleaned, & very fresh.

On Saturday, the girls & I stopped by the Hope High School farmers’ market to grab veggies & apples for pies. A little farther north on the same street is a great locally owned bakery where we picked up some dense wheat bread & a few baguettes.

Oddly enough, once we put everything together, all of the food except for the turkey & three of the desserts ended up being vegan. Only one vegan showed up, but I don’t think any one else noticed or minded. The ten pounds of mashed potatoes were mixed with two tubs of tofu sour cream & about a half cup of margarine. Anna made a sweet potato gratin by baking sweet potatoes, slicing them, & pouring vegan sour cream thinned with unsweetened soymilk over it. Then she baked it again with some nutmeg. I love sweet potatoes. This came out really well.

We sautéed collards & green beans, baked squash, threw together a salad with some red cabbage & edible flowers, & made stove top stuffing. Personally, I hated the stuffing. But what did I expect from a bag that said “Ready in 5 Minutes”. Also, it’s not something I recommend making on the scale that we did. It did make pretty good Thanksgiving sandwiches the day after, though.

Sunday morning I rubbed finely chopped onions, mild miso, & some unsalted butter under the skin of the turkey, a trick I wanted to try from last November’s Gourmet. Then I salt & peppered the skin & the inside cavity, tied up the legs, & stuck it in the oven for five & a half hours. Our oven cooks oddly, so I rotated the roasting pan after three hours when I basted the turkey. I think it looked absolutely beautiful.

For dessert, Gabriela, Maggie & Sharon brought yummy peanut butter chocolate chip cookies. The apple & pumpkin pies were easy classics that I made the day before. You really can’t have a serious turkey dinner without one or the other. And when you are feeding nearly forty people, you really should have both. We also made two of my favorite desserts. The seasonal one is called a cranberry duff, but it’s also known as Cape Cod or Nantucket Cranberry Upside-down Cake, or really any other New England name dropping title. This year’s recipe came from last November’s MS Living.

My other favorite is great anytime – Vegan Chocolate Pie. This is the easiest & richest chocolate pie I’ve ever come across. It’s also chock full of soy protein. The recipe for chocolate mousse comes from Heidi at 101Cookbooks and I put it in a pie shell for easy serving. I buy a package of Silken Soft tofu because any other brand ends up having a tofu aftertaste. This kind is sometimes unrefrigerated & comes in a carton like a juice box. I melt nearly a whole package of vegan chocolate chips, about 10 ounces, then blend them with the tofu & ¾ of a cup chocolate soy milk. The blender gives the smoothest results. I’ve never been able to get the job done with a hand mixer.

All I can say is that I adore my friends & the friends that they brought with them. Thirty-some-odd smiles & a house that smelled like the holidays made me the happiest I’ve been in a while. On top of that, we pulled together $41 for Second Harvest Food Bank. You people are amazing. Additionally, Etan & Josh did basically all of the clean-up. We are forever indebted.

(A few days before, Jessica's painting that used to be in our kitchen went up at Hillel. He's so cute!!)

Wednesday, August 2, 2006

Jada's Wedding Cake

Finally! After 10 cups of butter, 2 dozen eggs, and maybe a pound or two to the lower half of me, my first wedding cake is finished!

My mother’s friend got married this past weekend. The wedding was catered entirely by friends and family. When my mom heard that they were planning on boxed cake, she signed me up to bake something a little different. The bride likes raspberry, the groom likes lemon, and everyone likes vanilla butter cake, so what would have been a big slab of Duncan Hines turned into the three-tiered, three-layered monster you see above.

I baked three 10 inch square bottom layers at 2/3 the batter weight mentioned in the recipe. To split I marked the appropriate height with a serrated knife on all sides. Then I fit a thread into the marks, crossed the ends, and pulled it through the cake. The sliced off portions just cleared off the odd edges and moist humps in the middle and left a perfect layer underneath. It also left just enough scrap material to munch on during construction.

The middle tier was 8” and the top was 6”. A 10” and a 7” alone would be good for fifty people, but 10, 8, and 6”ended up looking really nice together. The bride wanted three additional 6” cakes with “So happy…”, “So lucky…”, “So in love.” written on them. This added up to over 180 servings of cake. Yikes. Thankfully the three small cakes were not meant to be cut and quite a few people had seconds of the real cake.

The three layers housed raspberry conserve as the lower filling and lemon curd on top. I used lemons from my tree out front. This lemon curd is unbelievable. I’m thinking of making up a couple more jars and giving some to my grandmother. She makes the best raspberry jelly in the country. I was afraid of the bottom layer splitting under its own weight and sliding around, so filled it with about half of the intended volume of fruit. Boring, but the top two layers looked and tasted phenomenal.

Making the mousseline buttercream (whipped butter, stiff egg whites, and hard-ball sugar syrup) was scary stuff, but it worked and held up nicely. To get the corners, I iced with a crumb layer then with fresh icing. I stuck the tier in the fridge for about half an hour, and then smoothed and shaped the cold buttercream with a hot spatula.

The bout in the fridge gave really nice corners and was probably only necessary because I was icing in our warm, sunny family room (so that I could watch The Empire Strikes Back and listen to the Yeah Yeah Yeahs and Rancid at top volume). Whatever the case, it worked like a charm and the cake had ample time to hit room temperature by the evening ceremony.

To stack, I inserted straws cut to the height of each tier through the center of the cake and at approximately the corners of the tier intended to sit above it. I stacked the cakes on their boards at the wedding using two real hands (thanks Dad) and two spatula hands. To cover up the buttercream stains on the base board (I’m new at this), I arranged some leaves from the alstroemeria around the bottom and no one was the wiser. I put a few flowers on the cake and voilà.

During the wedding I hid out in the kitchen with my date - a Tupperware container of dill and parsley - and garnished plates of hors dourves until I was blue in the face. All in all, the evening turned out well. The cake was delicious, I only nearly died of shyness, and I had a nine dollar party dress from Goodwill. Success!

I used recipes from The Cake Bible for the large scale white butter cake, mousseline buttercream, raspberry conserve, and lemon curd. I trust Rose Levy Beranbaum like no other woman on the planet. For anyone who is interested in baking cakes of any sort, I highly recommend this book. The author really knows her stuff. The recipes are fail-proof and every step is thoroughly explained. She recently released The Bread Bible which shows the same assiduous investigation of ingredients and methods published in The Cake Bible. I almost can’t imagine spending that much time, attention and energy practicing for and compiling something of this magnitude. She is definitely an inspiration. Amazon has copies of both books for $22.00 each, which is an absolute steal.